Tuesday, December 29, 2009

OpenCV & Python: Simple Image Operations

Here's a short example showing how to use openCV with Python.It reads an image from a file, displays the image, the Harris corner detector on that image and the Canny edge image:
(save this in a file named tmp.py and run with: python tmp.py )


http://pythonimage.blogspot.com/2009/04/opencv-example.html


import Image
import os
import sys
from opencv.cv import *
from opencv.highgui import *

def analyzeImage(f,name):

  im=Image.open(f)
  try:
    if(im.size[0]==1 or im.size[1]==1):
      return

    print (name+' : '+str(im.size[0])+','+ str(im.size[1]))
    le=1
    if(type(im.getpixel((0,0)))==type((1,2))):
      le=len(im.getpixel((0,0)))

    gray = cvCreateImage (cvSize (im.size[0], im.size[1]), 8, 1)
    edge1 = cvCreateImage (cvSize (im.size[0], im.size[1]), 32, 1)
    edge2 = cvCreateImage (cvSize (im.size[0], im.size[1]), 8, 1)
    edge3 = cvCreateImage (cvSize (im.size[0], im.size[1]), 32, 3)

    for h in range(im.size[1]):
      for w in range(im.size[0]):
        p=im.getpixel((w,h))
        if(type(p)==type(1)):
          gray[h][w] = im.getpixel((w,h))
        else:
          gray[h][w] = im.getpixel((w,h))[0]

    cvCornerHarris(gray,edge1,5,5,0.1)
    cvCanny(gray,edge2,20,100)

    cvNamedWindow("win")
    cvShowImage("win", gray);
    cvNamedWindow("win2")
    cvShowImage("win2", edge1);
    cvNamedWindow("win3")
    cvShowImage("win3", edge2);

    cvWaitKey()

    f.close()

  except Exception,e:
    print e
    print 'ERROR: problem handling '+ name


f = open(sys.argv[1],'r')
analyzeImage(f,sys.argv[1])

Python & OpenCV: How to crop images

cropped = cvCreateImage( cvSize(new_width, new_height), 8, 3)
src_region = cvGetSubRect(image, opencv.cvRect(left, top, new_width, new_height) )
cvCopy(src_region, cropped)

Reference:

Friday, December 18, 2009

Unit Pemprosesan Pusat

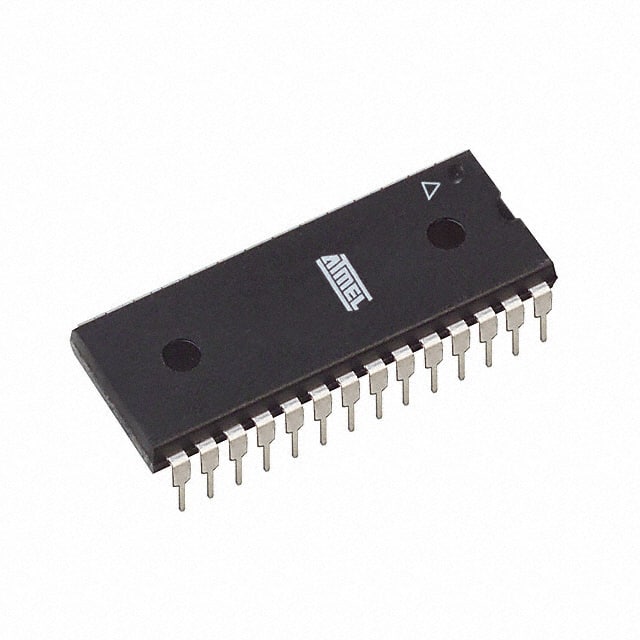
Ini gambar salah satu mikrokontroller yang murah dan kecil: AVR 8212.


Untuk menggunakan, kita diberi rajah blok berikut.


Rajah ini boleh dikatakan antara yang termudah. Banyak lagi rajah yang lebih rumit.

Sebenarnya, apakah yang terpenting dari banyak2 komponen tu? Hanya 3.

  • Daftar (register) - untuk menyimpan data
  • ALU (arithmetic/logic unit) - untuk melakukan operasi aritmetik dan logik
  • Litar kawalan (control circuits) - mengawal operasi cip


Untuk membina suatu sistem, perlu juga ditambah litar jam dsb.

Dari CPU, terdapat 3 "bas" yang berhubung dengan komponen2 lain.

  • Bas alamat (address bus) - mengandungi kod yang memilih peranti yang berinteraksi dengan CPU
  • Bas data (data bus) - laluan bagi data masuk/keluar CPU
  • Bas kawalan (control bus) - isyarat2 yang tidak termasuk dua bas sebelumnya. Berfungsi untuk mengawal peranti2 dan membawa kod mengenai status peranti2.


Akan datang: Fungsi komponen-komponen dalam CPU.

Monday, December 14, 2009

Mikropengawal (µC) atau Mikropemproses (µP)?

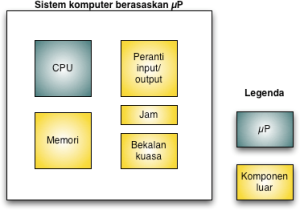
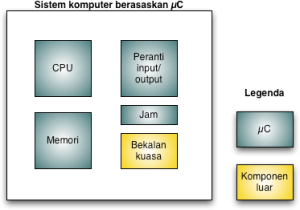
Mikropengawal (microcontoller atau µC) berbeza dari mikropemproses (microprocessor atau µP).

Ciri utama µC ialah kepelbagaian fungsi periferal dan memori dalam satu cip. Ini mengurangkan jumlah komponen dalam sistem, menjimatkan kos dan meningkatkan reliabiliti sistem.

µP seperti Intel Core i7 dalam PC hanya mengandungi unit pemprosesan pusat (central processing unit atau CPU). Mikropemproses tidak mempunyai memori, fungsi input/output seperti liang selari dsb yang diperlukan untuk membina satu sistem komputer lengkap. µP direka untuk menyediakan fungsi aritmetik dan logik pada tahap paling laju. Komponen lain disediakan oleh cip dan peranti luaran. Ini membolehkan µP disesuaikan dengan pelbagai keperluan pengguna PC.


Apabila melihat µC, kita akan perhatikan bahawa ia mengandungi memori, liang selari, jam, dan banyak fungsi periferal yang tidak terdapat pada µP. µC selalunya digunakan dalam produk terbenam seperti ketuhar gelombang mikro, pengawal enjin kereta, telefon bimbit dsb. Rekabentuk dan pengaturcaraan bagi produk sedemikian adalah bidang khusus yang dikenali sebagai reka bentuk terbenam (embedded design).


Perbezaan lain antara µC dan µP ialah µC direka untuk satu fungsi saja manakala µP boleh diprogram untuk melakukan apa saja yang diingini oleh pengguna. Kebiasaannya µC terletak dalam satu peralatan lain, dan pengguna tidak perlu dan tidak boleh menukar fungsi peralatan tersebut. Contonya µC yang mengawal ABS pada kereta hanya boleh melakukan tugas itu sahaja. Sebarang perubahan pada program sebenarnya akan mengundang bahaya.

Sunday, December 13, 2009

Apa itu "Sistem Terbenam"?

Sistem terbenam atau embedded system ialah litar komputer yang tidak kelihatan seperti komputer. Macam tak caya kan? Sebenarnya benda ni dah banyak kita gunakan. Siapa tak pakai handphone? Itulah dia contoh sistem terbenam. Dalamnya ada litar komputer lengkap: mikropemproses, memori dan input/output.

Nak tau apa mikropemproses dalam handphone? Lebih 90% handphone menggunakan mikropemproses berjenama ARM. Bukan lengan. Bukan senjata. ARM. Asalnya dari perkataan Acorn RISC Machine. So ARM ni suatu akronim yang di dalamnya ada satu lagi akronim: RISC. RISC ni pulak maknanya Reduced Instruction Set Computer. Berbelit-belit kan?

Anyway, ARM ni syarikat yang tak buat cip. Kalau kopak handphone tu, tak jumpa cip berlogo ARM. ARM ni jual design dia kat orang lain. So cip ni mungkin berlabel Philips, Motorola, Broadcomm, Marvel, Samsung, Oki, bla bla...

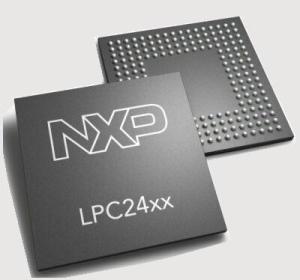
Cip NXP LPC24xx mengandungi pemproses ARM.

Pe-pe hal, konfirm dalam handphone ada komputer sebab nama cip pun ada perkataan komputer. Silap-silap dalam handphone bukan ada satu tapi lebih mikropemproses. Macam iPhone.

Apa lagi contoh sistem terbenam? Fuuh kalau nak disenaraikan, panjaang sebab semua benda yang ada mikropemproses dah boleh dikira sistem terbenam. Kat sini ada sikit:

Kat rumah:
  • MyKad: ya ya di dalamnya ada mikropemproses
  • Pemain MP3 macam iPod
  • Pemain DVD
  • TV tak kira jenis LCD atau CRT
  • Kamera digital
  • Lensa kamera DSLR
  • DSL modem
  • Mouse
  • Keyboard
  • Remote controller: ada mikropemproses kecik di dalamnya
  • Thumb drive/Pen drive/USB key
  • Printer
  • Banyak permainan
  • Ketuhar gelombang mikro (nama berbelit untuk microwave)
  • Mesin basuh yang agak moden sikit
  • Air-con yang agak moden sikit
Kat kereta (bergantung kecanggihan, boleh ada 20 ke 80 mikropengawal dalam kereta):
  • Engine control unit (ECU)
  • Radio kereta: kalau jenis yang muka depannya boleh tanggal, muka depannya ada satu mikropemproses asing
  • Anti-lock braking system (ABS)
  • Automatic transmission
  • Cruise control
  • Air-con
  • GPS
  • Banyak lagi, katanya lebih 50 biji mikropemproses setiap kereta
Aplikasi military:
  • Peluru berpandu (missile). Orang Indon kata "rudal".
  • Radar
  • Sonar
  • Radio
  • Sistem navigasi
Cukuplah dulu.

Kereta ini sistem terbenam? Atau di dalamnya terbenam sistem terbenam?

Wednesday, September 9, 2009

Converting SVG to PDF

Inkscape output to PDF or save to PDF is no good. It changes the fonts to ugly Bitstream Vera whatever. Use Batik Rasterizer instead.


Install it anywhere you like. In my case, it's located in /opt/batik.

To convert files, use the command as shown (assuming you're in the directory where the SVG file is located):

$ java -jar /opt/batik/batik-rasterizer.jar -m application/pdf Figure1.svg


Thursday, September 3, 2009

Getting LibSVM to work with Weka on Mac

Somehow, the only way to use LibSVM with Weka is by using the bash command-line.


Step 1: Get Weka.
Assume the bleeding edge version 3.7.0. Unzip and put in /Applications folder.

Step 2: Get LibSVM.
a. Iowa State site (http://www.cs.iastate.edu/~yasser/wlsvm/wlsvm.zip):
If you use Safari to download, it will be unzipped in the Downloads directory. The files you need are ~/Downloads/WLSVM/lib/wlsvm.jar and /Downloads/WLSVM/lib/libsvm.jar
b. Taiwan site(http://www.csie.ntu.edu.tw/~cjlin/libsvm/libsvm-2.89.zip):
Using Safari to download, the file you need is ~/Downloads/libsvm-2.89/java/libsvm.jar

Step 3: Open Terminal and copy to Weka.app. Assume you have privileges to write into Weka.app.
a. Iowa State version:
$ cp ~/Downloads/WLSVM/lib/*.jar /Applications/Weka/weka-3-7-0.app/Contents/Resources/Java
b. Taiwan version:
$ cp ~/Downloads/libsvm-2.89/java/libsvm.jar /Applications/Weka/weka-3-7-0.app/Contents/Resources/Java

Step 4: Set CLASSPATH
$ export CLASSPATH=$CLASSPATH:/Applications/Weka/weka-3-7-0.app/Contents/Resources/Java/

Step 5:Run Weka from Terminal!
$ java -classpath $CLASSPATH:weka.jar:libsvm.jar weka.gui.GUIChooser &

Conclusion: Bash sucks less!

Thursday, August 13, 2009

Screen Capture on Mac

Unlike the PC, the Mac has no PrtScreen button. To capture a screen, use cmd-shift-4 to take screenshots and save to disk, and cmd-ctrl-shift-4 to take screenshots and copy to clipboard.

The captured screen will be on the desktop named Picture 1.pdf, Picture 2.pdf and so on. Some blogs say the default filetype is PNG, but not on my Mac.

To change default filetype to some other filetype, launch Terminal, and depending on what file type you want outputted, type (or copy and paste) the appropriate line below followed by return:

defaults write com.apple.screencapture type pdf
defaults write com.apple.screencapture type png
defaults write com.apple.screencapture type jpg
defaults write com.apple.screencapture type tif


Quit Terminal, log out of your account and log in for the change to take effect right away. To revert to the default png format, type 'defaults write com.apple.screencapture type png' as shown above (no single quotes), or delete the com.apple.screencapture plist file in your user preferences folder (no need to restart).

Using Canny edge detection in OpenCV

The second Python example works on my MacBook. So HighGUI does work on the Mac OS X.

Batch Image Processing with Python

Adapted from http://www.coderholic.com/batch-image-processing-with-python/

If you want to make changes to a single image, such as resizing or converting from one file format to another, then you’ll probably load up the image in an editor and manually make the required changes. This approach is great for a single image, but it doesn’t really scale past more than a few images, at which point it becomes time consuming, not to mention boring!

This is where Python and the Python Imaging Library (or PIL) come in, allowing you to write scripts that process images in batch.

Batch Processing

No matter what processing we want to do on our images the script outline will be the same: loop over all provided arguments, and perform the processing. The code to do this is shown below:


#!/usr/bin/env python
import sys
import Image

# Loop through all provided arguments
for i in range(1, len(sys.argv)):
try:
# Attempt to open an image file
filepath = sys.argv[i]
image = Image.open(filepath)
except IOError, e:
# Report error, and then skip to the next argument
print "Problem opening", filepath, ":", e
continue
# Perform operations on the image here

This will allow our script to be called in all of the following ways:

$ batch_process.py image.gif
$ batch_process.py image1.png image2.gif image3.jpg
$ batch_process.py *.png
$ batch_process.py image1.gif, *.png


With the help of PIL the image processing is really simple. Below is a collection of just some of the operations we could perform. For more details see the PIL documentation.

#Resize an image
image = image.resize((width, height), Image.ANTIALIAS)

# Convert to greyscale
image = image.convert('L')

# Blur
image = image.filter(ImageFilter.BLUR)

# Sharpen
image = image.filter(ImageFilter.SHARPEN)

Saving

Once we’ve processed the image we need to save the changes. In some instances we might just want to save over the original filename. If that’s the case we can just call the save method of image with its original filename. If we want to save the file under a different name, or as a different filetype we need to do a little more work:

# Split our original filename into name and extension
(name, extension) = os.path.splitext(filepath)

# Save with "_changed" added to the filename
image.save(name + '_changed' + extension)

# Save the image as a JPG
image.save(name + '.jpg')

Notice in the last example how PIL takes care of the conversion to JPG for us. All we do is provide the file extension and PIL does the rest for us.

A Complete Example

Each of the steps above can easily be put together to create a batch image processing script. Below is a complete script which creates thumbnails of all provided images, and saves them as PNG images, not matter what their original format:

!/usr/bin/env python
# Batch thumbnail generation script using PIL

import sys
import os.path
import Image

thumbnail_size = (28, 28)

# Loop through all provided arguments
for i in range(1, len(sys.argv)):
try:
# Attempt to open an image file
filepath = sys.argv[i]
image = Image.open(filepath)
except IOError, e:
# Report error, and then skip to the next argument
print "Problem opening", filepath, ":", e
continue

# Resize the image
image = image.resize(thumbnail_size, Image.ANTIALIAS)

# Split our original filename into name and extension
(name, extension) = os.path.splitext(filepath)

# Save the thumbnail as "(original_name)_thumb.png"
image.save(name + '_thumb.png')

Instaling Eclipse for Python

Be default, we all can use python interpreter to test smaller codes but really, it is not a feasible way to write fast code so you can use Eclipse, probably the best open source IDE in the market and create and manage python programs using it.

IBM's Eclipse project was a veritable breath of fresh air, at a moment when it was most needed. The development of open source IDEs seemed to have stopped – with a lot of users sticking to emacs and vi, despite spectacular (but unfruitful) development from Kdevelop and Anjuta.

Eclipse is very extensible and able to work with just about any programming language. In this short tutorial, we will talk about how to set up a Python development environment, using Eclipse and PyDev. The reference distribution is Ubuntu, but aside from the command to install packages, everything will be identical on any distribution.

Step 1.
Obtain and install the Java Runtime Environment (JRE). In most cases, there is a package readily available for most distributions, and it is a dependency for Eclipse. You only need to install JRE manually if there is no readily-available package, or if your package manager does not resolve dependencies automatically (and unless you are using plain RPM, without Yum, or Slackware's package manager without a tool like slapt-get, chances are it does)

Step 2.
Install Python. The version you use depends on your needs. PyDev has a rather wide support.

Step 3.
Install Eclipse and PyDev. Most distributions have a separate package for Eclipse and PyDev. However, there are a lot of distributions which do not provide a PyDev package, since Eclipse can install it itself.

If PyDev cannot be installed by using the distribution's package manager, it can be installed by using Eclipse's Update Manager. To install PyDev from Eclipse, go to Help, Software Updates and click Find and Install.

In the wizard window that appears, choose “Search for new features to install” and click Next. This will open a new window. Click “New Remote Site”, and in the dialog box that appears, enter “PyDev Extensions” in the Name text box, and http://www.pydev.com.br/updates in the URL text box. Click Ok and follow the subsequent on-screen instructions.

Step 4.
Configure the Python interpreter. After you have installed PyDev, open Eclipse and go to Window, Preferences, PyDev, Interpretor – Python (or Jython if you use it instead of Python). Near the Python interpreters list box, click New and navigate to the Python executable on your system (it's usually /usr/bin/python. If it's not there, run the command 'which python' without quotes, and use the path it returns). PyDev will automatically detect some required settings. Once this is over, you are ready to go.

You can now use Eclipse to work on your Python projects. Most project management functions should be familiar to you, and PyDev has a wide range of features, from code completion to refactoring tools.
Installing Java on Ubuntu 9.04

Currently Ubuntu has the following Java packages

sun-java6-bin – Contains the binaries

sun-java6-demo – Contains demos and examples

sun-java6-doc – Contains the documentation

sun-java6-fonts – Contains the Lucida TrueType fonts from the JRE

sun-java6-jdk – Contains the metapackage for the JDK

sun-java6-jre – Contains the metapackage for the JRE

sun-java6-plugin – Contains the plug-in for Mozilla-based browsers

sun-java6-source – Contains source files for the JDK


Use the following command from a terminal

sudo apt-get install sun-java6-jre sun-java6-plugin sun-java6-fonts

MacPorts commonly used commands

As usual, this blog is for keeping notes, as I, like, keep forgetting commands.

Installing a port (example given is for php):

port search php
port info php5
port variants php5 sudo
port -v install php5 +apache2 +mysql5

Upgrade all outdated packages:

sudo port selfupdate
sudo port upgrade outdated

Use the upgrade command with care. In the case of Python 2.5, it will update some of the libraries to 2.6, breaking half of the modules.

For a complete list of all installed ports:

sudo port installed

Sunday, July 5, 2009